Learning / Remote Pro Legacy Articles / Video Booth Post Processing
Video Booth Post Processing
The second of two tutorials explaining how to set up a video booth in DSLR Remote Pro, and enhance the videos captured by the app.
DSLR Remote Pro can be used to run a video booth as well as capturing still photos. The original video is often post processed to add effects, branding and presentation. Videos use large quantities of data, which can be slow to transfer and process, so post processing is also used to crop and reduce the video to a more practical size for sharing by email or text.
The first tutorial Video Booth Basics was an introduction to running a video booth powered by DSLR Remote Pro, running through
- Equipment
- Getting started
- Customizing your setup
- Video Booth Settings Window
- Camera settings
- Video guest books
- Hints and troubleshooting
- Live view
- Video playback screen
- Video duration and download time
- Sharing your videos
- Reliability issues and camera connection problems
- Software hangs when downloading to a PC
- Mirrors and shooting in portrait
- Video settings shortcut button
This tutorial Post processing Videos covers
- Video processing screens
- Boomerangs, loops and playback speed
- Cropping to square and other formats
- Resizing for efficient sharing
- Branding & Presentation: Overlay, Intro, Outro, Sound track and Audio
- Video effects: Speed ramps, jump cuts, combining effects
- Slow motion
- Speeding up post processing time
- Hints and troubleshooting
- Cropped videos & live view
- Saving both original and final videos
- Screen names
- Error log
- Anti virus issues
Post processing Videos
Video booth screens
DSLR Remote Pro gives fine grained control over videos, using three video booth windows: (1) Video Booth Settings, (2) Video Postprocessing Settings and (3) Video edit list.
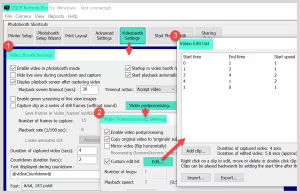
Video Settings Windows (Breeze DSLR Remote Pro 3.17.1)
Simpler controls for post processing can be found in (2). To build combinations of effects use the video edit list (3)
(1) Video Booth Settings contains mainly guest interface and playback settings. Enable video in photobooth mode must be checked to capture videos. More..
(2) Video Postprocessing Settings is used to set the simpler post processing instructions, including audio capture, cropping, resizing, playback speed, reversing direction (boomerangs) and the number of loops. Enable video processing must be checked for any processing to take place.
(3) Video edit list is where you set combinations of effects including speed ramps and jump cuts. This is the place to switch from slomo to fast forward, while playing the clip forwards or backwards. Check Custom edit list on the Video Postprocessing Settings window to reach this screen.
Video edit list settings override boomerang, loop and playback speed settings in the Video Postprocessing Settings window.
When Custom edit list is checked loop, boomerang and playback settings in the Video post processing settings window are greyed out.
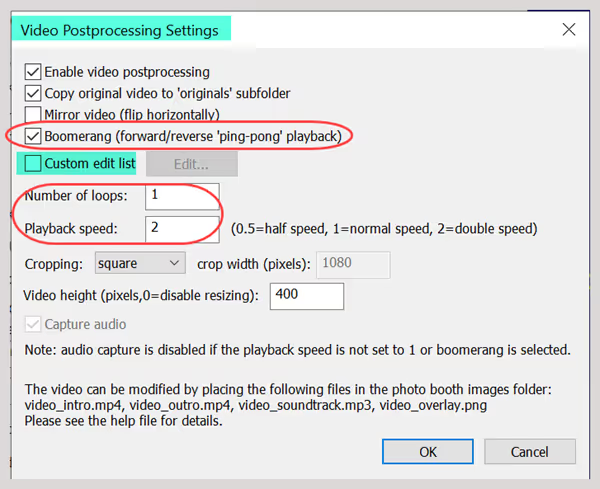
Edit list unchecked*. Played back as double speed boomerang.*
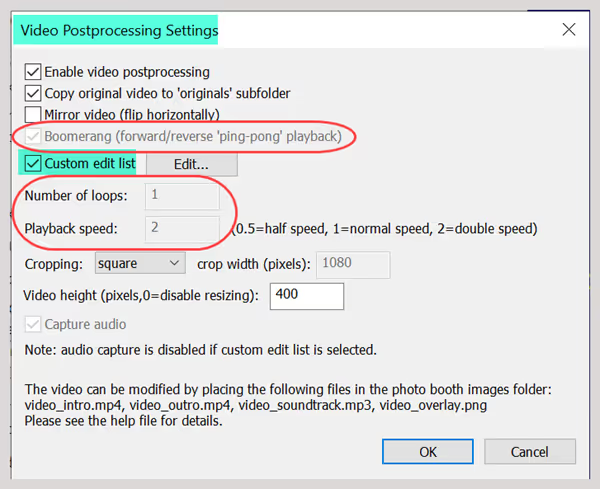
Edit list checked. Played back following edit list commands.
Boomerangs, Loops and Playback Speed
When Video Postprocessing Settings is not checked the playback speed, number of times the video loops and whether it reverses direction are controlled from in the Video Postprocessing Settings window
Boomerang
When Boomerang is checked the video will be played back forwards then in reverse.
If the video loops more than once, the boomeranged video will replayed.
Looping
Loop the video if you want it to play more than once.
Playback speed
Playback speed 1 usually plays the video back at it’s original speed (except when shooting at 120 or 180 fps – see below).
- for faster playback, increase the playback speed. Playback 2 doubles the speed
- for slower playback, reduce the playback speed. Playback 0.5 halves the speed.
For high quality slow motion, use a camera shooting 180 fps or 120 fps and see the Slow motion instructions below.
Cropping videos to square and other aspect ratios
Cropping is used to change the aspect ratio (shape) of the final video, and is applied before any resizing.
Square videos
To produce square videos, set Cropping to square.
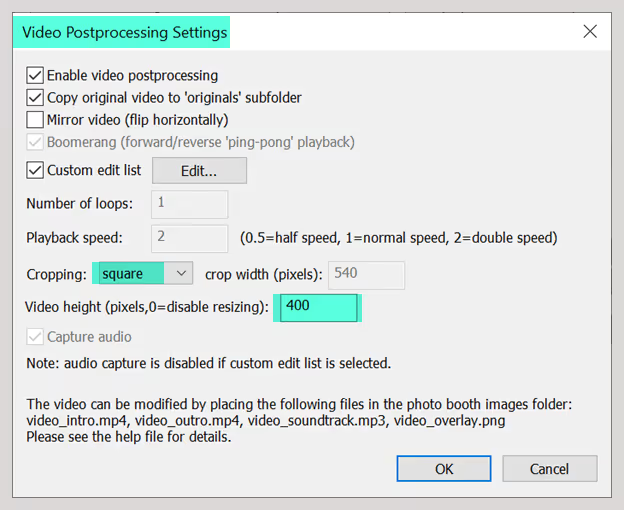
Video cropped to square 400 * 400 pixels
Custom crops
To produce videos with aspect ratio 3:4, set Cropping to custom and crop width (pixels) to 3/4 times the original video height.
- When shooting 720p, the crop width is 540 pixels (720 *3/4) for aspect ratio 3:4
- When shooting 1080p, the crop width is 810 pixels (1080 *3/4) for aspect ratio 3:4
Resizing videos for faster sharing and processing
Smaller videos are generally processed and shared more quickly.
To reduce the size of your video, reduce its height in pixels. When the video height is reduced, the aspect ratio is unchanged.
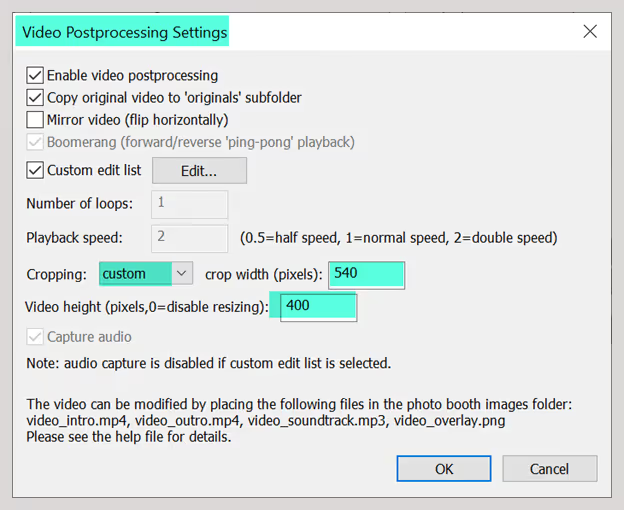
*720p video cropped to aspect ratio 3:4 and height 400 pixels. (Final video 300 wide 400 high)
Branding and Presentation
This section covers adding overlays, intro and outro videos, adding a soundtrack and capturing audio.
Size and aspect ratio of the final video (cropping and resizing) needs to be resolved before adding overlay and intro/outro videos.
Video overlay
To add a dynamic video overlay, create an Apple ProRES4444 video called video_overlay.mov with transparency information in the alpha channel. Add this to the PhotoboothImages folder.
The overlay video should be the same size as the processed video.
Static Overlay
To add a static overlay to the video, place an image called video_overlay.png in the PhotoboothImages folder.
We suggest that the overlay is the same size in pixels as the video you play back ie after any cropping and resizing.
Intro and Outro videos
Intro and outro videos must be the same size (in pixels) as the processed video. If they are different sizes they will be discarded
To add an intro video place an image called video_intro.mp4 in the PhotoboothImages folder.
To add an outro video place an image called video_outro.mp4 in the PhotoboothImages folder.
Audio from intro and outro videos will only be included if the original video has audio and is played back once at normal speed. Audio from the intro or outro videos will be discarded if the video is edited or does not contain audio.
Audio
You can capture sound with your video, or add your own soundtrack. Choose from three options
- Video intro, outro and the captured video all have sound
- Audio soundtrack replaces any sound track in the captured video, intro and outro videos
- Play silently
Adding a soundtrack
You can add an MP3 soundtrack by calling your soundtrack video_soundtrack.mp3 and placing it in the photo booth images folder. The soundtrack plays from the beginning of any intro video, and must be at least as long as the final video including any intro and outro.
Using a soundtrack with intro and outro videos
The sound track replaces any sound in the captured video, intro and outro videos.
Audio from intro and outro videos
Audio from intro and outro videos is only used when both the captured video has audio, and is played back at normal speed.
Audio capture
Check the Audio capture box in the Video post processing Settings window to record sound with the original video.
Audio capture is disabled if you select Custom edit list, Boomerang, change the Number of loops or Playback speed.
Creating Video FX
Check Custom edit list then Edit.. on the Video Postprocessing Settings window to access the Video Edit List and add special effects to your videos.
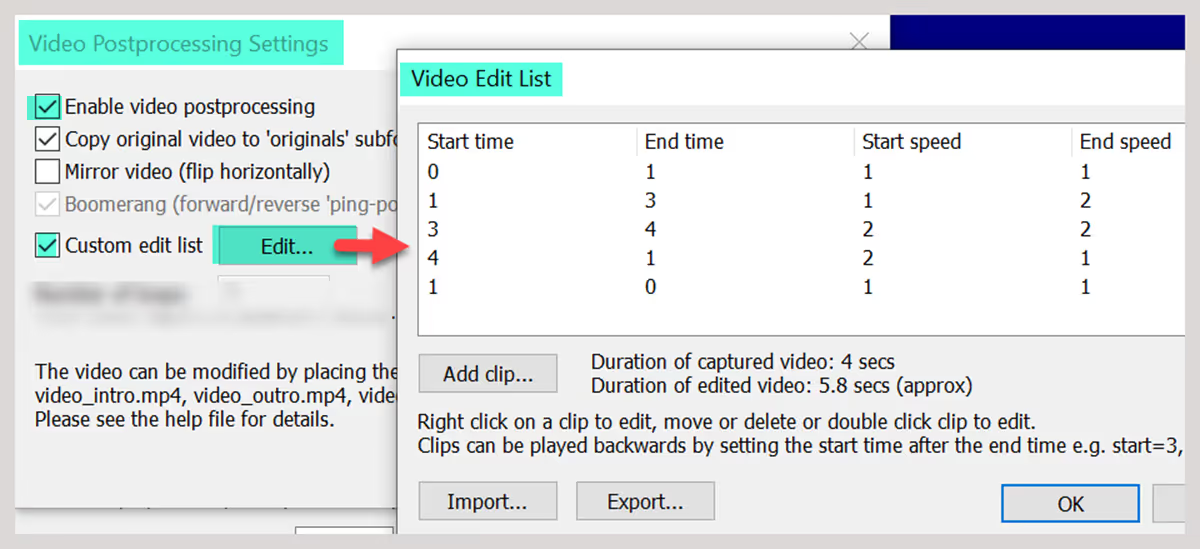
Accessing the Video Edit List (Breeze DSLR Remote Pro 3.17.1)
This is where you cut the video into clips and reassemble them, applying different effects in different clips.
Clips
Individual clips can be added, edited, moved around and deleted. You can also save and reuse effects you or others have already built.
Each clip consists of a start and end time, start and end speed:
- Start time and End time refer to the original captured video.
- To playback a 10 second video without any changes, Start time is 0, End time 10, Start speed and End speed are both 1.
- Start speed and End speed are the playback speeds at the beginning and end of each clip.
Use clips to create speed ramps, jump cuts, glitches, boomerangs and loops playing at variable speed.
Speed ramps
- Speed ramps up when the End speed is faster than the Start speed.
- Speed ramps down when the End Speed is slower than the Start speed.
Sample Video Edit List – Boomerang effect with speed ramping up during forward segment and back down during reverse (Breeze DSLR Remote Pro 3.17)
Jump cuts
Jump cuts interrupt the flow of a video by jumping to a different section
Glitches
Create glitches by repeating short sections of the original video
Boomerangs
To create a boomerang effect, play the video forwards and then backwards.
- First clip Start time 0, End time 10
- Second clip Start time 10. End time 0.
Loops
Loop the video by repeating one or more clips as many times as needed
Importing and exporting Video Edit Lists
You don’t need to assemble a set of clips for every event. Import and export your edit lists to reuse complex effects.
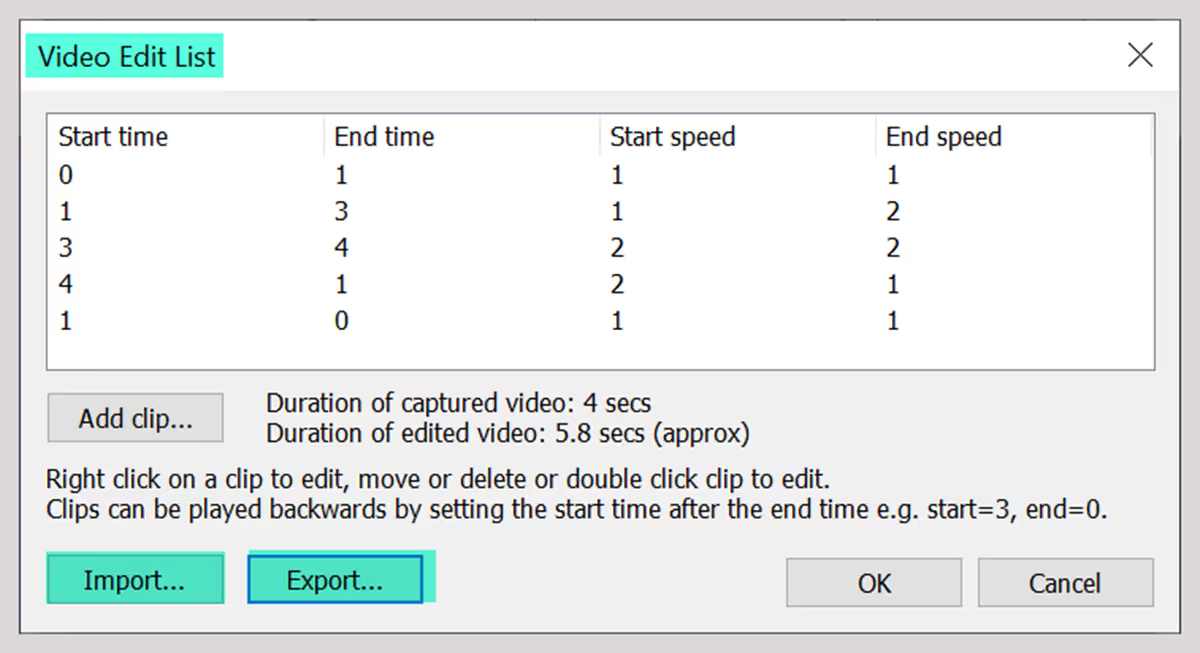
Import and Export buttons for Video Edit Lists (Breeze DSLR Remote Pro 3.17.1)
Slow motion shooting at 120 fps and 180 fps
For best slow motion results use a camera with 180 or 120 frames per second (fps) capability*.
* Canon’s EOS R6 Mark II captures both 180fps and 120fps video*. Other* models which capture 120fps video include Canon EOS R100, R10, R7, R6, R5, M50 Mark II, M50, M6 Mark II, M200, Canon PowerShot G5X Mark II and G7 Mark III at the time of writing (February 2023)
Cameras with the special slow motion setting capturing video at 120 frames per second (fps), automatically replay at 1/4 of this speed ie 30fps. This gives excellent quality slow motion playback, with playback speed set to 1.
Canon’s EOS R6 Mark II also captures 180fps video, automatically replaying at 1/6 of this speed ie 30fps. This gives even better quality slow motion playback.
Most DSLR Remote Pro slow motion is currently shot at 120fps, so the worked example below uses this speed. There are short extra notes at the end for those shooting at 180fps or slower frame rates.
120fps video duration
Because 120fps videos are automatically replayed at 1/4 speed, a 3 second video shot at 120fps will have a duration of 4*3 ie 12 seconds, and sound is not captured.
To play back 120 fps video at half the normal speed, increase the playback speed to 2. To play back at normal speed, increase playback speed to 4. To play at double speed, set playback speed to 8.
Be aware of the changed duration when using the Video edit list.
Using the video edit list when shooting 120fps
In the example below video duration was set to 4 seconds in the Video Booth Settings screen.
The movie was taken using 120fps.
Using 120fps the video took 4 seconds to capture.
Because 120fps was used, the video downloaded to the computer is 4 *4 seconds long ie 16 seconds long.
This can cause confusion using the Video Edit List screen.
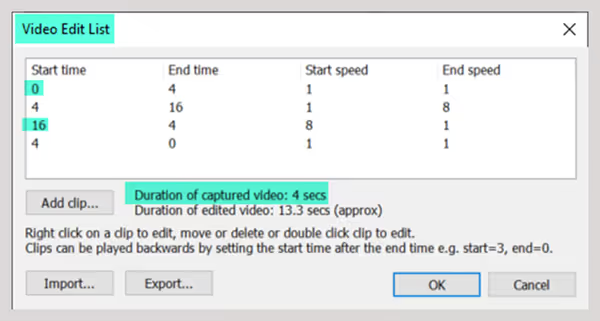
Video Edit list for 120fps video captured to camera duration 4 seconds, and duration of video saved on the computer 16 seconds (DSLR Remote Pro 3.17.1). Clip start and end times refer to the 16 second video.
DSLR Remote Pro may show warnings when you save individual clips and the complete list. In this case the warning can be ignored and the settings accepted.
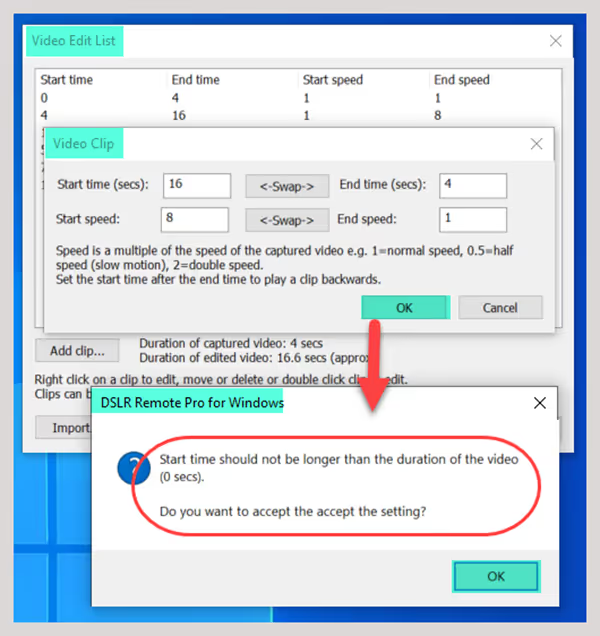
Start time should not be longer than the duration of the video warning (Breeze DSLR Remote Pro 3.17.1)
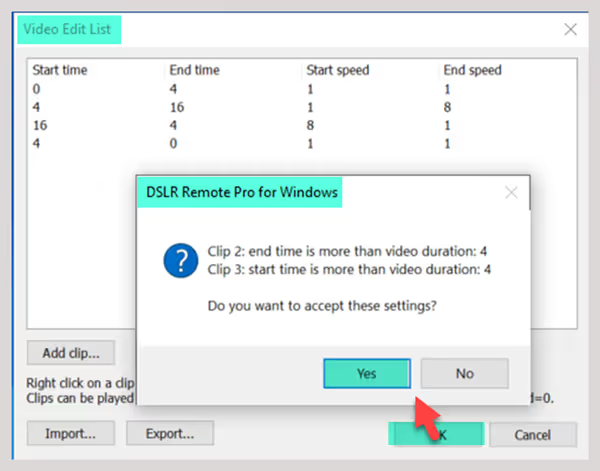
End time is more than video duration and Start time is more than video duration warnings (Video Edit List Breeze DSLR Remote Pro 3.17.1)
Shooting at 180 fps
Shooting at 180 fps produces smoother slo mo than shooting at 120 fps.
Because 180 fps videos are automatically replayed at 1/6 speed, a 3 second video shot at 180fps will have a duration of 6*3 ie 18 seconds, and sound is not captured.
To play back 180 fps video at half the normal speed, increase the playback speed to 3. To play back at normal speed, increase playback speed to 6. To play at double speed, set playback speed to 12.
Be aware of the changed duration when using the Video edit list.
Shooting slow motion with other cameras
You can create slow motion video with other cameras, but the quality will not be as good. Canon camera models which don’t support 180 fps or 120fps can capture video at up to 60fps. You can play this back slowly (e.g. 1/4 normal speed by setting the video playback rate to .25), but this won’t give as good quality as (for example) a Canon EOS R10 capturing at 120fps
Producing finished videos quickly
Videos use large quantities of data, which can be slow to transfer and process. Photo booths are designed to be fun and have a fast turnaround. You need to balance fast results with high video quality.
Minimise both download and processing time to produce and playback the finished videos quickly.
Download time is covered in the Video Booth Basics, and is affected by the length of clip captured (duration), frame rate and image quality. Wired download via a USB cable is generally faster than wireless download.
This tutorials looks at processing time in more detail.
Processing time
We recommend a fast, recent computer with a quad core, i5 or i7 processor and SSD to process videos quickly. The main factors are the speed of the processor, number of cores and the computer’s storage. Increasing the amount of RAM above 4 or 8GB will have little or no effect on the processing speed. More..
Video duration, frame rate and image quality also affect the processing time – reducing each of these speeds up processing the video as well as the time it takes to download from the camera.
Reducing the size of the video by cropping and reducing its height generally also decreases the processing time.
Video edits: Videos with many edit steps are likely to take longer to process than simpler versions.
To speed up the post processing
- Use a powerful computer as above
- Reduce the amount of data
- Consider shooting at 30 fps instead of higher frame rates (except for slow motion)
- Start with image quality 720p. Only shoot higher quality images if video quality is more important than processing time.
- Resize the video to the minimum height which produces acceptable quality
- Keep intro and outro videos small
- Consider whether a shorter video would work as well as longer duration
- Minimise the number of edits
Hints
Cropped videos and live view
When videos are cropped, you also need to mask the live view (if shown) to match, so that what guests see on screen is included in your final videos.
This is done by adding a video_live_view_overlay.png to the PhotoboothImages folder. More
Saving both the original and final versions of your video
To save both the original and final versions of guest’s videos, check Copy original video to ‘originals’ folder in the Video Postprocessing Settings window.
Screen names
Some of the screens used for video booths have different names to those used when shooting still photos.
- video_ready.jpg – displayed when the video booth is ready to capture the next clip
- video_countdown.jpg – displayed together with the countdown text during the countdown before capturing the clip
- video_capture.jpg – displayed together with a progress bar while the video clip is being captured
- video_processing.jpg – displayed after video capture while the movie file is being transferred to the PC
- video_playback.jpg – displayed when playing back the video that has just been captured
- video_playback_finished.jpg – optional screen image displayed after playback or after downloading the video if auto playback is not enabled
More about screens displayed to guests.
Troubleshooting
If video post processing is not producing the results you expect, check the error log.
Error log
Errors or warnings generated during the postprocessing are automatically logged to a file named DSLRRemotePro.log in your Documents folder.
Anti virus issues
Sometimes antivirus software can interfere with the postprocessing by blocking a command line utility called ffmpeg.exe. More
Detailed online manual
You can find a fuller description of video shooting in DSLR Remote Pro in the online manual.