Learning / Remote Pro Legacy Articles / Previews & Retakes
Previews & Retakes
Many operators show guests a preview of each photo as its is taken. Sometimes guests want to retake a photo, or restart the whole session part way through.
Retaking a single photo is faster than restarting the photo booth session.
This tutorial explains how to offer preview images and retakes in DSLR Remote Pro. It also covers restarting a session part way through.
You will need
- preview.jpg in the PhotoboothImages folder
- suitable Image preview time in Advanced Settings. This provides a timeout for the preview screen after which the photo is automatically accepted
- buttons and touchscreen actions to accept or retake the photo, and if required to restart the whole session.
Creating your preview background
- If necessary create a preview.jpg image* and add it to your PhotoboothImages folder.
- preview.jpg should be the same size in pixels as the booth screen
- Include accept, retake photos and restart session buttons if you are offering these choices.
* When you build a new design using the Photobooth Setup Wizard, preview.jpg is created automatically if you check Preview every photo after it is taken is selected at Step 2.
preview.jpg background image with icons to accept and retake a photo
Set the Image preview time
Select Advanced Settings and set Image Preview time to the maximum time you want the preview screen to be displayed.
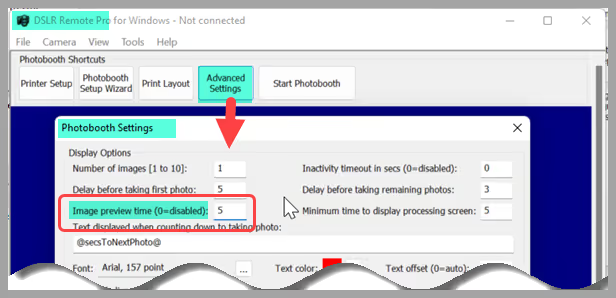
Image Preview time set to 5 seconds (Breeze DSLR Remote Pro 3.18.1.1)
If Image Preview time is set to 0 (zero) the preview screen will not be displayed.
Add touch screen actions to accept, retake and restart the session
For guidance on using touch screen actions, see Customizing screens
- You may need to reduce the size of the Photo preview area and reposition it to make room for your action buttons.
- Add the actions to accept and retake photos. If required, add an action to restart the whole session.
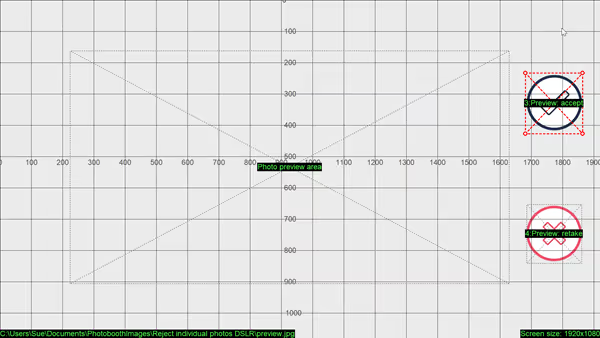
Adding a Preview accept action to the DSLR Remote Pro preview screen
When you have finshed, close DSLR remote Pro to save your changes. Then open it again and check everything works as you expect.